by John Markwell | Contributing Editor
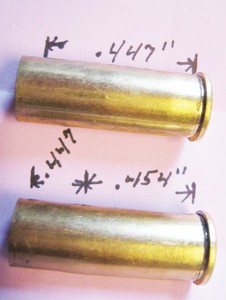
The upper .44Magnum case was re-sized in an old style, single ring carbide sizing die. The entire case body measures .447”. The lower case has been resized in the Redding Dual Ring sizer. Only the forward part of the case is sized to hold the bullet at .447” while the remaining case body is sized to .454” for a better chamber fit.
Like all gun folks, we have sometimes had our shooting equipment and experiences suffer because we didn’t have access to (or were too cheap to buy) certain tools or items that would have obviously made some shooting-related tasks easier. Be it specialized reloading equipment or some other special tool or gizmo, we, like many shooters, have often “made do” rather than obtain some needed item. This make-do behavior has often been detrimental to our performance or, even worse, has caused damage to a valuable firearm. What follows is a run down on some handy items we’ve recently acquired and found to be extremely useful. Some of these are pretty simple and others are probably overkill for the casual firearms hobbyist. However, we have found them all to be pretty utilitarian and thought readers might find them of some interest.
Checking Handloads for Reliability—There’s nothing more aggravating than trying to practice, compete or hunt with handloaded ammunition that will not function properly in your firearm. For too many years, we pulled the barrels out of 1911 pistols to chamber check the fit of handloaded .45ACP or 9mm ammunition destined for use in practical pistol matches. Also in the past, we have hand-cycled some .223/5.56 ammo through AR actions to insure that it will function. These methods worked, but were a bit inconvenient. A while back, we acquired a couple of chamber check gauges for 9mm and .45ACP cartridges and another for .223/5.56 ammunition. Life is simpler now, for sure. Better late than never.
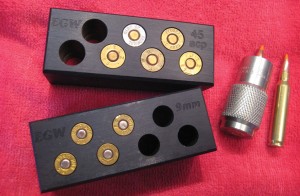
Checking the chamber fit of reloads with the EGW and Dillon Case gauges is a snap and certainly beats using a pistol barrel or cycling ammo through the gun.
The gauges for 9mm and .45ACP are made by EGW and were purchased from Dillon Precision (1-800-223-4570). Each anodized aluminum gauge contains seven holes which are precision cut with Clymer chamber reamers to mirror the chambers of pistol barrels. Using these gauges is exactly like using a pistol’s barrel for a gauge except that no disassembly of the gun is required and seven rounds can be checked at a time. Just drop the loaded cartridges in the holes, run your thumb over the case heads to make sure they are flush with the gauge and that the primers are all well seated (and not upside down) and you are good to go. Dump one bunch of cartridges out and repeat. We’ve found the 9mm gauge to be especially useful for sorting out those fat-headed reloads from Glock-fired range pick-up brass. The stainless steel Dillon .223-case gauge we have checks case length and head space. We don’t worry much about overall case length in the .223/5.56 and mainly use this gauge to check loaded rounds for chamber fit; if they drop in freely and the case head is flush with the gauge body, everything is generally good to go. This .223 gauge will only allow the checking of one cartridge at a time but is still lots better than cycling the ammo through a rifle’s action. We now check all of our 9mm and .45ACP pistol ammo destined for competition with the EGW gauges and most of our .223 handloads for AR usage are dropped into the .223 gauge. See the Dillon website for caliber availability and current pricing on these handy gauges. We’ve always had great reliability from our handloaded ammunition in calibers .223, 9mm, and .45ACP and these cartridge gauges from Dillon Precision have only enhanced that reliability.
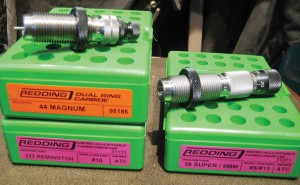
Redding’s Dual Ring Carbide sizing Die (left) and the Micro-Adjustable crimp die both help reloaders make better ammunition.
Speaking of Handloading—For too many years we handloaders, at least those of us whose ammo requirements leaned more towards quantity than quality, overlooked some of the finer points of the process. As long as the ammo fired, shot well enough, and functioned in the intended firearm, we were happy. Most early practitioners of “Practical Shooting” were not sponsored by ammo and gun companies and had to load their own ammo. We made do with bargain bullets and were completely happy with the reloading equipment of the day. Simple sizing and crimping dies worked just fine for us then, and they still do. However, things change and as the technology of handloading advances, so too does our outlook on the process and the final results: better ammo and better accuracy and reliability. To that end, we’ve been using a couple of new items from Redding Reloading, (607-753-3331) that have led to our producing better ammo; some for handguns and rifles.
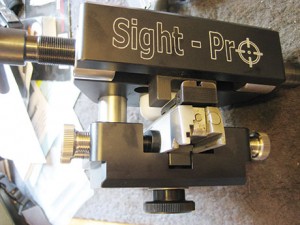
The MGW Sight-Pro is a beefy professional grade sight pusher that offers solid support for pistol slides when installing/adjusting dovetailed sights.
Redding introduced their Dual Ring Carbide sizing dies a couple of years ago and we wanted to try one but couldn’t decide on which one to get. Needing to get a bunch of .44Mag ammo loaded up, that ended up being the die I obtained. The Redding Dual Ring carbide sizing die sizes the forward bullet retaining portion of the case to one diameter and the case body to another. This dual case sizing enhances consistent bullet tension and contributes to better chamber fit of the cartridge without overworking the brass and increasing case life. We installed the dual ring sizing die in the .44Mag tool head for our 550 Dillon loader and went to work whipping out a pretty good batch of our general purpose .44Mag load; .245 Kieth bullet over 9 grains of Winchester 231. There seemed to be less force required to resize the .44Mag cases with the Dual Ring sizing die in the Dillon machine than with the standard single ring die we had been using, but that could just be our perception. We have yet to get out to compare accuracy between the ammo loaded with the Dual Ring Sizing Die and that loaded with our old style sizer as it has been really cold here in the mountains. However, the fit of the ammo in the chambers of our old 6½ inch S&W Model 29 should be a bit more precise as the case diameter from just above the web to about the base of a seated bullet is .453” compared to .447” for the case bodies sized in our old die. That is .006” larger and it should allow for better bullet/chamber mouth/forcing cone alignment. You can actually see the difference, as the case body is noticeably fatter than the forward section which holds the bullet (that measures .447”). Essentially what the Dual Ring Sizing Die does is create a more precise cartridge to chamber fit. The first carbide ring sizes the main body of the cartridge case to fit the chamber, while the second ring in the die sizes the forward section of the case to hold the bullet. We look forward to shooting this batch of .44 ammo and comparing it to some of our old loads.
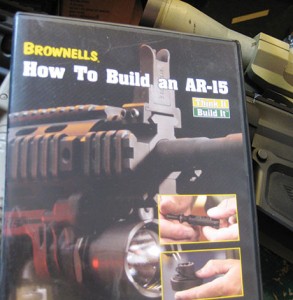
The Brownells AR15 video is a great tool for anyone wanting to build or repair a rifle, plus it will guide you to other tools you need for working on AR15s.
We load a lot on progressive machines and have found that adjusting dies is often difficult due to the cramped nature of the machine’s tool heads. This is especially true when dealing with crimp dies. Redding’s new Micro-Adjustable Taper Crimp Dies have eliminated the course adjustment of dies utilizing the standard 7/8-14 threads and the standard lock rings commonly found on most dies. Redding’s new Taper Crimp Dies have a knurled micrometer type barrel located on top of the die for easy crimp adjustment. After getting the die set up the micrometer offers +/- .100” of adjustment. For cases with similar dimensions the reversible crimp sleeve can be inverted to accommodate two different cartridges; i.e. .38 Super/ 9mm or .40S&W/10mm Auto. We have been using the Redding Micro-Adjustable Taper Crimp Dies for loading both 9mm on our Dillon 650 and .223 heavy bullet loads on our Dillon 550 with great success. We have found the Micro-Adjustable crimp dies especially convenient when loading different batches of GI 5.56 cases, from different manufacturers, as case wall thickness varies from one batch to another. For those who struggle with getting the proper amount of crimp due to the course threads of most crimp dies these new Micro-Adjustable Crimp Dies from Redding are a definite step in the right direction.
Bore Sighting—Being a pretty serious prairie dog/varmint shooter and AR enthusiast, we have accumulated a goodly number of .223/5.56 rifles over the years and seem to always have some sort of .223/5.56 rifle project going on. Historically, we have done the look down the bore routine, when beginning the scope zeroing process. Recently however we’ve been doing a fair amount of research on optics for AR rifles and have found that the Laser Boresight from Sightmark, is just about the best thing ever for starting the zeroing process on a rifle. The Sightmark boresight is a machined brass chamber insert that contains a laser. To use the boresight, the batteries are inserted and the laser is turned on when the battery cap is screwed down. Then it’s a simple matter of gently chambering the whole deal; the laser’s dot will show the shooter where the rifle is pointing. With the rifle held in a steady position, it is a simple matter to dial the optic’s reticle into alignment with the dot (this is easier with two people but not overly difficult for one). Once the rough zero is reached it can be finely tuned by shooting. This laser boresight saves both time, and money spent on ammunition, by simplifying the sight-in process. Once an optic is zeroed, the Sightmark laser boresight can also be used to verify or check a zero. Should one lose track of the number of turns taken on a long range optic’s turret, or simply severely bang an optic in a fall, a scope’s zero can be checked with the Laser Boresight if a note has been made of the reticle/laser dot relationship.
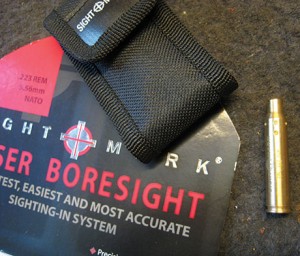
The author’s SightMark Laser boresight is the same size as a .223/5.56mm cartridge case and is simple to use.
The Sightmark laser boresight comes with a compact cordura case and is available in several calibers and gauges for use in rifles, handguns and shotguns. Retail on the Sightmark boresight is around $30. We got ours from Brownells, but we have seen them in brick and mortar gun stores and other catalog outlets. Our laser boresight for the .223 Remington now permanently resides in our range box and sees considerable use. We may get one in .308 in the near future.
Adjusting and Installing Pistol Sights—We don’t know any serious handgunner who hasn’t buggered up the sights on at least one handgun in their lifetime, while either changing out or adjusting the fixed sights on an auto pistol. The advent of the dovetailed front sight made life somewhat easier for those of us who shoot autoloaders, but changing out the front and rear sights on pistol slides still involves the use of well-directed force to move the little buggers in their dovetails. Removal, replacement or adjustment of pistol sights are some of the most common gunsmithing tasks undertaken by the growing number of handgun shooters out there. How popular is it to change out pistol sights? A look through the Brownells catalog at the endless number of aftermarket pistol sights easily answers that question. And, who hasn’t had to just “bump” the rear sight a bit to achieve a solid zero or change out a front sight to get the point-of-aim/point-of-impact to coincide.
We have wrecked a few sights in our time; we admit it. The old brass or nylon punch and hammer technique has worked for us but sometimes it gets pretty ugly when the dovetail/sight fit is a bit too tight. We’ve busted a couple of night-sight inserts and dinged a couple of slides using the hammer/punch system, but we now have a tool which makes dealing with dovetailed pistol sights a snap.
The Sight-Pro sight tool from Maryland Gun Works, (phone: 706-793-1770) is one beefy machine. Designed for the professional gunsmith, the Sight-Pro is specifically designed for installing, removing and adjusting both front and rear dovetailed pistol sights. The Sight-Pro is not a small tool. It can be used clamped in a bench vice or hand held. Pistol slides must be removed from the frame and are held in the tool with one of the many brand-specific “clamp shoes” which are sold separately. We obtained a clamp shoe for 1911 pistols with our unit. With our pistol’s slide clamped in position, the Sight-Pro’s thread driven pusher block is used to move/remove/install the front or rear sight. This is an over-simplification but the MGW folks have a Youtube video that goes over the operation of the Sight-Pro tool in great detail and a video is included with each tool. We have wanted a real sight pusher for a very long time and hopefully we have augered our last pistol sights now that we have the MGW Sight-Pro in the gun room. So far, we couldn’t be more pleased with the Sight-Pro’s performance and, as friends find out about the tool, they are more than willing to contribute to the growing number of clamp shoes we have on hand in order to allow the tool’s use on their pistols. At $330 the MGW Sight-Pro is not cheap. However, it is cheaper than replacing those wrecked night sights or having a pistol’s slide refinished after it has been gouged by an errant hammer blow. Available from Brownells, the MGW Sight-Pro is one great tool. If the price puts you off, maybe you could get your shooting buddies or club members to chip in to buy one. Regardless, once used the MGW Sight-Pro will become one of those “why didn’t I do this sooner” tools; it’s that good.
Brownell’s AR video—AR rifles are all the rage now and they are much like the Erector Set of times past for gun folks. Complete rifles and carbines can be built by most anyone with a modicum of mechanical skill with only the lower receiver requiring transfer through an FFL holder. The rest of the parts are readily available on the Internet and through catalogs like Brownells and Midway USA. For those who already own an AR platform rifle, any number of “uppers” can be built from scratch (or purchased complete) and interchanged on the same lower receiver. Different calibers, barrel lengths, sight set-ups, rail interfaces, and suppressor adaptability can all be reasons to build another “upper” for one’s existing gun.
Although we have a pretty good working knowledge of Eugene Stoner’s AR rifle system, we had never thought of building one, until recently. The upper for our Lightweight Homestead Carbine project (TheGunMag, Vol. 3, #28) was built by our buddy Garry Powers, but the project stirred my interest to know more about the intricacies of building an AR rifle.
After perusing Brownells ARBuilder section on their website, we decided to order their How to Build an AR-15 video for $29.99. It’s narrated by Tim Dillon, a former US Army small arms repair specialist. This video is just what we needed to answer the many questions we had (and some we didn’t know we had) about the AR15 weapon platform. Tim goes over every aspect of building an AR15 in a very simple to follow format. Each segment of the video deals with a specific subassembly, or parts thereof. From the simple replacement of hand guards to complete re-barreling and gas tube installation, every aspect of AR construction is covered in great detail. The photography is high quality and there is no question about what one is looking at, as the details of each process are quite clearly shown.
Whether one wants to build a complete AR15 or just do some simple repairs to a gun you already own, we highly recommend this video from Brownells. Here in the Allegheny Mountains, we are in the process of making up our parts (and tools) list for a complete AR15 project to build. We’ll let you know how it turns out.
As man has evolved so has the complexity and specialization of his tools. We gun guys are no different than the Neanderthals in that we learn some lessons the hard way. Sometimes it takes years of “making do” before that light goes on, telling us there has to be a better way. The above are just some of the modern tools that have enhanced our shooting experience. There is a long list of others we’d like to try, so stay tuned and Good Shooting.

