by Art Merrill | Contributing Editor
As we gain experience in handloading our own ammunition we discover new-to-us techniques and tools that get us where we want to go. That destination might be higher volume reloading, faster priming or case trimming that’s easier on our fingers. As handloaders move from beginner to advanced levels, rifle shooters in particular seek the holy grail of precision, shooting the smallest groups possible. In our quest to learn how to make better precision ammo nothing substitutes for research and simple armchair reading, which is what you’re doing now.
So while we’re just sitting here, let’s take an easy step forward into advanced territory, a more precise way of measuring and determining cartridge overall length that will equate to shooting smaller groups. This will entail using two cool tools.
Chamber-rifling meet & greet
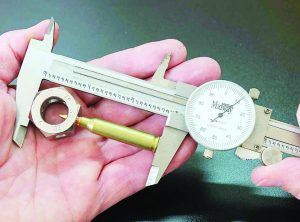
Measuring to a bullet’s ogive is more precise and realistic than measuring to the bullet tip.
Using a rifle bullet as our illustration, look at the area where the bullet tip curves back into the body or shank or bearing surface, the part that is full caliber diameter. The point of that curve (radius) is the bullet ogive, and this is where bullet and bore do their first meet & greet.
One critical aspect in precision rifle shooting is the relationship between the bullet ogive and the chamber area variously called the leade, throat or freebore, that transition area between the chamber and the bore. Here, the bullet loaded in a typical cartridge of proper length doesn’t touch the chamber, it just kind of hangs out in space.
Loading manuals necessarily list a cartridge’s overall length (COL or COAL) as the measurement from case base to bullet tip; this measurement is critical for proper fit of the cartridge to chamber in order to avoid problems with physical fit and overpressure. Too long and the bullet jams into the rifling (and the action may not even close); combined with a tight bullet crimp, this situation could raise chamber pressures beyond desirable or even safe limits. A too-short COL means the bullet has a long “jump” before it reaches the rifling, and it’s this jump that concerns us here.
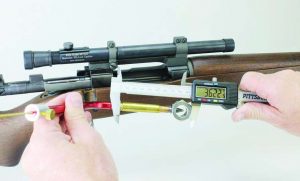
The Lock-N-Load OAL Gauge delivers exact ogive-to-lands COL measurement.
COL is important but, again, the bullet tip (meplat) doesn’t even touch the rifling; rather, it is the ogive that makes first contact with the rifling. That first contact—including how far that bullet ogive must jump across open space to reach the rifling—can determine more precisely where that bullet ends up downrange. Just one or two thousandths of an inch difference in COL and subsequent bullet jump can make a significant difference in group sizes—and in hunting, whether the bullet lands where you pointed it—especially at extended ranges.
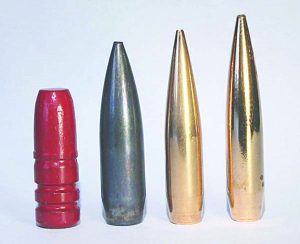
Bullet ogives vary widely, as in this sample of .30 cal. and 6.5mm bullets.
But bullets—even match grade open tip match (OTM) bullets—are not manufactured in tolerances to the last .001” (that said, see sidebar). Bullet lengths vary a few thousandths at the tip due to manufacturing methods; there are several products out there that will cut these tips to uniform length, and that is one approach to using base-to-tip COL measurements to seat bullets more precisely. But you still must first determine optimum COL for your chamber/cartridge combination.
Hornady’s Lock-N-Load OAL Gauge combined with Sinclair’s Bullet Comparator will do both jobs, and this combo is the way to go if you don’t like the idea of modifying bullets or if you don’t want the added step of cutting bullet tips.
Hexing ogives
Taking the Sinclair tool first, the Bullet Comparator is a small, stainless steel hexagon with a precision hole drilled in each flat surface. Each hole inside diameter (ID) is for a specific caliber, cut with that caliber’s throating reamer. Note that the .308 caliber comparator ID, for example, measures .300”, not .308”. This is because the .30 caliber has a standard groove diameter of .308” and a bore diameter of .300”. That is, the bore is .300” in diameter before rifling grooves are cut .008” deep, so the bullet’s ogive makes first bore contact with the rifling’s .300” bore diameter lands.
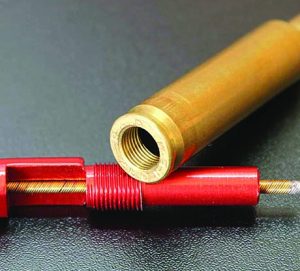
Cases must be threaded to fit Hornady’s OAL Gauge
We use the tool on a loaded cartridge by slipping it over the bullet until it lightly seats against the bullet’s ogive, then using calipers, measure from the top of the tool to the base of the cartridge case. This gives us a new measurement not found in loading manuals, the base-to-ogive OAL. To determine what base-to-ogive OAL we want, we first use the Hornady OAL Gauge in our specific firearm, in conjunction with the comparator.
The Lock-N-Load OAL Gauge utilizes a cartridge case and a bullet inserted into our rifle’s chamber to arrive at a real-world, precise base-to-ogive OAL. While the gauge itself is the heart of the tool, it also requires that we thread a trimmed-to-proper-length empty cartridge case on it. This case is modified by drilling out the primer pocket and threading the hole to accept the Lock-N-Load OAL tool. Hornady offers a large variety of threaded standard cases from .17 Rem to .45/70, and for a small fee will thread a case that you provid—for example, as I did with a .260AI wildcat some time back.
Simply thread the case into the gauge, and push the plunger (a length of flex cable) up to the bottom of the case neck to prevent the bullet from dropping into the case. Place a bullet in the mouth, insert tool, cartridge and all into the chamber, unlock the push rod and use it to maneuver the bullet forward until it stops at the rifling. Lock the push rod in place with the knurled thumbscrew. Withdraw the tool with case and bullet (usually the bullet stays in the lands and you have to hold the rifle vertically and tap the butt to let it drop out). With the bullet in the case and resting against the tool’s push rod, use the gauge and the comparator together (see photo) to measure the base-to-ogive OAL.
Jump adjustment
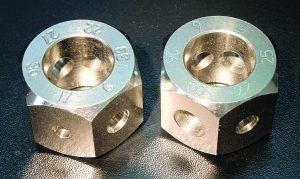
Two Sinclair Bullet Comparators cover most rifle calibers
Now that you know this measurement, you can adjust bullet seating depth to control the distance of bullet jump to the rifling lands. A rule of thumb is to first find your load that looks promising, then start fine-tuning bullet seating depth. Many rifles do best with bullets seated not more than .005” off the lands – that is, a jump of not more than .005” – and many seem to shoot tightest groups at .001” to .002” off. So, load five to 10 cartridges with bullets seated .005” below the measurement you got with the OAL Gauge, five to 10 more at .004” and so on until your last batch is .001” off the lands; shoot each for groups and go with the best one.
Be aware that you might find your optimum seating depth for best accuracy results in a COL too long to allow cartridges to feed through a magazine. This a fairly common problem with AR-15s that have 5.56 NATO chambers, as those throats are longer with a shallower angle than .223 Rem chamber throats. It sometimes happens with bolt-action rifles, too, and the lightest (shortest) varmint bullets often limit how far we can seat them out of the case.
Even if hamstrung by chamber-magazine limitations, the COL-to-ogive exercise can serve as a diagnostic for those rifles that seem to have mysterious proclivities for some bullets and not others. The tools are inexpensive and the “Aha!” factor is quite satisfying.
See the Lock-N-Load OAL Gauge (MSRP $43-$50) at www.hornady.com. The Sinclair Bullet Comparators ($20) are available from Brownell’s at: www.brownells.com.


