by Scott Smith | Contributing Editor
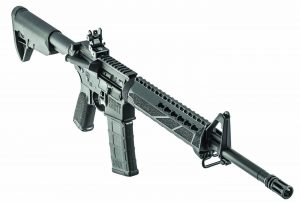
The Saint as she ships from Springfield Armory, a solid carbine that can be turned into a fine 3-Gun rifle.
Just before Christmas 2016 I started receiving emails from Springfield Armory regarding the super-secret new firearm. The internet was all abuzz from Twitter to Facebook to various shooting forums—all had their theories as to what The Saint was going to be. Was it a new XD, enhanced 1911? Well, all the guesses were way off. The Saint turns out to be a value packed AR15/M4. I had a chance to handle it at the SHOT Show and it was a good bang for the buck.
I know that the worldwide web has been going crazy about Springfield being a turn coat and needs boycotted. As much as I would like to get in that debate, we are here to discuss taking The Saint ($899) from a solid shooter to a serious competition rifle.
First thing was to see how the rifle would shoot with iron sights at 50 yards. Yes I know, that is not a long range, but I use a 50/200 yard zero on my ARs so this works. I had a few offerings from Black Hills and Federal which would become the ammunition used for all the accuracy testing. The initial testing was done with mil-spec 55-grain full metal jacket from Federal. Out of the box, the M4 was shooting consistent sub ¾” groups. Being well over 21, with my beat up old body I was shocked and happy. This rifle was going to be able to do all I needed it to do and to turn this average rifle into a full race-ready Saint.
While the Saint has a medium contour 1 in 8 twist barrel with mid-length gas system and heavy “H” tungsten buffer, it was lacking for my purposes. It suffered from not having a free floating forearm, shipping with a Bravo Company Keymod forearm, heavy trigger (in spite of being Nickel Boron coated), a GI gas block/front sight, Bravo Company adjustable stock and pistol grip. These parts are all more than adequate for duty and general applications, but not for 3-Gun competition.
I wanted a 15-inch free floated forearm, longer stock (the BCM was just the right length to pull out my goatee hairs), a lighter single stage trigger, optics, a flip up front sight, and to give her a face lift so The Saint looked racy.
The easiest parts were a spare Magpul flip-up front sight and a Rogers Stock; now about the rest of these parts…what to do?
First, fire, up the computer and head to Brownells (Phone: 800-741-0015; Online: brownells.com) for a low profile gas block and forearm; of which I knew they would have many options. The gas block chosen was Brownells low profile three set screw model which costs $16.92. I have used these on several ARs and they fit like a glove. Next, a lightweight forearm was needed. This took a bit more searching. I wanted something that was different but would be durable, lightweight and affordable. I came across Odin Works O2 Lite 15.5” Keymod at $179.70. We will discuss the details in a bit.
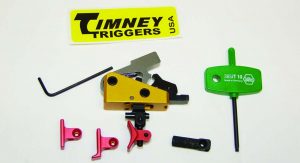
Timney’s Calvin Elite Trigger is one of the best AR triggers I have used. It will improve your AR’s accuracy.
Next a trigger that is bullet proof is needed. I have become a fan of drop-in units so you don’t have to fight with springs and small parts. Over the years I have had good luck with Timney Triggers (Phone: 866-484-6639; Online: timneytriggers.com) so I opted to use the new Calvin Elite, with an MSRP of $299.95.
Next an affordable optic to build this for tactical class was needed. At the 2017 SHOT Show, I came across Lucid Optics (Phone: 307-840-2160; Online: lucidgear.com). Their new 1-6X24 L7 retailing for $449 and their quick detach mount at $139 were good choices. These items would be the major changes.
After shooting the rifle with the Odin Works forearm, I realized I didn’t like the feel so I contacted VZ Grips (Phone: 850-422-1911; Online: vzgrips.com) for two sets of their long and short Slim Rail Grips which sell for $22.75. I also wanted to protect the Keymod so I ordered BCM Slim Rail Covers at $9.52 and KAG Angled Grip $18.13. While not needed, these parts make the thin forearm fit my hands better.
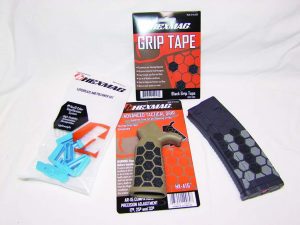
Hexmag supplied their HexGrip Tape, Advanced Tactical Grip, Gen2 Hexmags that accept stripper clips, and HEXIDs to give The Saint a custom feel.
The last item I changed was the factory installed BCM Mod3 Pistol Grip. It just didn’t feel right. I installed a Hexmag (Phone: 855-439-6247; Online: Hexmag.com) Advanced Tactical Grip at $27.99, grip tape at $9.99 and since Hexmag supplied the OEM Magazines a couple Series 2Hexmags at $14.99 and a couple sets of HEXIDs at $11.99 for four. This grip allows you to vary the angle and the grip tape makes the grip feel right; at least to me.
The biggest job on any AR is changing out the forearm. The reason is you have to remove all the hardware; barrel nut, springs, forearm and front sight/gas block. BCM uses a unique locking system that makes removal of the forearm a snap. The top locks into the bottom and while a spring clamp makes removal faster/easier it’s not needed. Next you need to drive out the retaining pins on the sight block (drive left to right; mark left side so you can slip them back into the block). Now you can remove the sight block unit; it will slip off. Next put the upper receiver into a vice block (also available from Brownells) so you can remove the barrel nut which will remove the locking spring too, with an AR Armorers Tool. Now is the time to install the Odin Works barrel nut, per their specifications, followed by the adapter nut. You will find there is a small solid rod; this is to align the gas tube with the barrel nut. Many a gas tube has been destroyed during the tightening process. Now mount the forearm with the forward rail section on top of the barrel and install the six set screws; apply supplied Vibra-Tite to ensure they don’t come loose. I apply a drop to the barrel and adapter nuts for the same reason. Now the forearm is installed and rock solid; if you flex the barrel The Avengers are calling for a Hulk stand-in.
I chose the Odin Works forearm for two reasons; one it weighs only 11 ounces for a 15.5” rail and it is uniquely styled. The looks help make the rifle a unique looking carbine while the reduced weight longer rail aids in tracking targets and muzzle control. What gives this rail a cool look is the wavy supports that wrap the rail to the Keymod sections at 3, 6, 9 and 12 o’clock. The top rail extends three slots from the receiver and there are four slots on the front; this is how Odin reduces weight. To mount a light there is an additional five slot section of rail included; you can purchase more if needed. Odin Works allowed my front flip-up sight to mate perfectly with the Springfield Armory flip-up rear and they zeroed dead-on at 50 yards.
With the upper and lower receivers apart it was time to install the Timney Calvin Elite Trigger. When I said I was avoiding small parts, I neglected to mention the spare trigger pads and straight trigger bar that ship with the CET. If you have not installed a trigger in your AR, click the video tab on Timney’s homepage; they will take you step by step, it’s too involved to detail in this article.
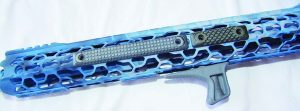
Close-up of VZ Grips Slim Rail Cover in Frag and Recon textures; they dissipate heat and give you superior purchase in all conditions. You can see the BCM KAG Angled Grip and Keymod covers as well.
What drew me to the CET was the interchangeable trigger pads and angle of the trigger bar. This allows you to truly customize the feel of your AR and gives you a nearly true straight pull to the rear. It might not seem like much, but this and the 1.5-lb. pull weight allows you to bring out the most accuracy you can out of The Saint or any other AR. A few of my buds at Elizabeth Township Sportsman Association shot the rifle with the CET installed and all they could say was AWESOME, it hits everything you aim at, how much? This one piece unit that Timney built is truly wicked cool. I am not a gadget guy for triggers but this one gets my stamp of approval because it is a true improvement you will feel Pads can be purchased in silver, gold, red, blue, black and green to give it a unique look.
Coupled with the CET, Hexmag’s Advanced Tactical Pistol Grip gives you practically perfect shooting hand, trigger finger placement. I am not sure at what angle I installed the ATPG, but it felt better than the OEM grip. The middle the first pad of my trigger finger fell dead on the CET every time. I had a comfortable grip mounting the rifle, during movement, changing shooting positions. The grip pads gave a good purchase in the rain and during testing on the first truly hot/humid days in the tri-state area.
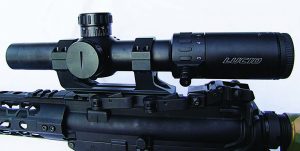
If you are looking for a quality optic that will not break the bank, Lucid’s L7 with the QD Mount is hard to beat.
You would not think being able to adjust the angle of an AR’s pistol grip would greatly affect the feel of the rifle but it does. Since I am no longer wearing a uniform, I appreciate being able to make this M4 fit just right. I had leftover Vibra-Tite from the forearm so I put a drop on the grip bolt to ensure it stays put too.
Now that the basics of the 3-Gun rebirth of The Saint were complete, it was time to mount and zero the Lucid L7. This 30mm tube scope fit perfectly into Lucid’s QD Mount. Unlike most illuminated reticle optics which use either red or green illumination, Lucid uses blue. Those who are color blind can see the circle/dot when it is on one. Unlike red/green the blue illumination does not wash out in green foliage or the desert. There are eleven brightness settings which make the reticle visible in all but truly the brightest of conditions. There is 60MOA correction in each direction from zero, ½ MOA at a time. The turrets are pull-out to adjust.
Lucid’s mount locked securely and unlocked easily once you depress the safety catch on each lever. Once the L7 was mounted, very few shots were required to zero the rifle. Thanks to a screw-in throw lever, you can go from 1 to 6 power quickly and smoothly. This is a must on 3-Gun stages with targets at 5 yards then out at 200. You will find this optic shockproof up to .458SOCCOM, so it should survive most hunting/target calibers. Once I started running the L7 I forgot it was priced under $450, that’s how smoothly the power ring rotates and how positive each adjustment is.
Once the scope was zeroed, with quality ammunition from Black Hills, Federal and Hornady sub MOA performance was the norm. The best group I fired was ½” for five shots at 100 yards with Black Hills 68-grain Heavy Match. I found at distances out to 200 yards the POA/POI was not significant enough to change zero when shooting 68, 69, or 75 grain loads. This speaks highly of the scope/rifle accuracy, and consistency of modern ammunition when loaded to SAAMI specifications.
Having determined that The Saint was a fine shooting firearm, I needed to make it “mine.” To do this I looked at what was new from Lauer Weaponry/Duracoat (Phone 800-830-6677; Online: lauerweaponry.com). They had a new series of “hex” patterns which are big and bold. To make them bolder I chose bright colors; unfortunately the red, yellow, orange I wanted to use with the HexGun Swarm washed out. The colors were too close for there to be any great contrast. Fortunately HexGun Wrap when used with bold shades of blue was a bright cool looking finish.
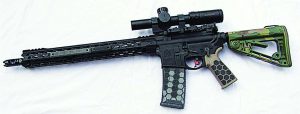
The Saint with all of its improvements waiting for its final touch Duracoat
Over the last couple years manufacturers have been sealing the anodizing so preparing the firearm is very important. To start the process, I used a nylon scrubber to scuff and abrade the finish without removing it to bare metal. Then the entire firearm was wiped down with DuraPhos Pretreatment which gets the anodized or bare metal ready to accept DuraCoat. At this point I applied the lightest blue to be the lines of the pattern. After drying it overnight the decal matrix was applied and the remaining two colors were applied. This was allowed to dry for about half an hour and the matrix was removed. Removing the matrix before the finish totally cures prevents peeling and gives sharp lines.
To finish up The Saint’s conversion I installed one short and one long Slim Rail Cover on each side of the forearm. I used both the Frag and Recon rails which can be had in black, black grey, hyena brown or dirty olive. Like all of VZ Grips, grips the rails are made from G10. G10 is a virtually indestructible glass-reinforced epoxy that is impervious to most firearms chemical. G10 when molded gives you superior shapes such as the box squares of the Frag and scoops of the Recon which give you superior purchase in all conditions. On an AR forearm during sustained fire the G10 also insulates your hand from the hot aluminum rail.
VZ molds the threading for each screw into the panels. This ensures that the Keymod screw and panel become one with the Odin rail. You will feel the locking tab tighten into each slot in the forearm. Try as I might, these rails will not move.
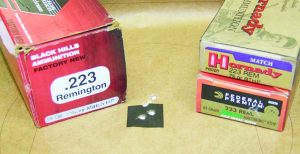
Best group from the finished Saint at 100 yards with Black Hills, shown with Federal and Hornady test ammunition.
Over the years I have found if you do not put a cover of some sort on Picatinny rails, and now Keymod, they will get damaged. I wanted to keep the cost and weight down so BCM’s Slim Rail Covers were snapped in place. The polymer covers barely increase the diameter of the rail yet they protect the attachment points.
The last item I added was a BCM KAG Angled Grip. This is purely a personal choice item like rail covers. The KAG like other grips gives you a consistent grip point and when used with a “modified C-grip” it aids in recoil management and it can be used as a pull support when shooting off of a wall or tree. BCM’s KAG allows you to get a solid one-hand grip for firing or when transitioning to a sidearm or getting a grip on a prop.
No doubt there will be folks who wonder why I would choose to use Springfield Armory’s Saint as a base gun for a competition rifle instead of purchasing an AR that has all these features. It’s simple, the bones of this rifle are pretty impressive and you can purchase all the enhancements one part at a time so as not to destroy your budget. You can peruse Brownells for all the parts that were used to enhance The Saint and if you prefer you will find dozens of other options. If you prefer a red dot over a scope, Lucid has the HD7 which should meet your needs.
I hope that this article shows you how to start with a solid hard use M4 such as Springfield Armory’s Saint and turn it into a full house competition M4. You will have the pride of knowing you rebuilt the carbine to your perfect firearm and if you are a thrifty shopper it will cost a lot less than buying a carbine from a big named company. I will stand behind my choice to customize The Saint. This M4 will be used for 3-Gun this year. Whether you choose to run The Saint stock or built it like I did; shoot safe, shoot straight and most of all: have fun.


