by John Markwell | Contributing Editor
I should never have gotten Brownells’ “How to Build an AR-15” video. This video, narrated by Tim Dillon, made the whole process of building an AR-15 from a pile of parts look so easy I just had to try it. After the 2015 SHOT show, stuff started showing up: a barrel; free float hand guard; stock; upper and lower receivers, and a bunch of small plastic bags (purchased from Brownells’) containing roll pins, detents, springs and other small parts (not all labeled by the way). Pretty soon I had a box full of stuff that I was assured, by my armorer friend John Miller, could be turned into an AR-15 carbine.
Bear in mind that I am not a gunsmith and do not purport to be one; a serious tinkerer yes, a gunsmith, no. My buddy, John, says that the title of “gunsmith” is not a prerequisite for AR building. He compares it more to working with high tech Legos or an Erector Set.
I started assembling the small parts with the upper receiver first. The forward assist and ejection port cover looked to be pretty simple to install and so they proved to be. Getting the little snap ring on to the end of the ejection port hinge pin proved to be a challenge due, in part, to my being sort of fumble fingered when it comes to handling really small stuff. The last thing I wanted was to drop the little bugger on the charcoal-colored carpeting of the gun room. The forward assist went in without a hitch and I drove the first roll pin of the project without buggering it up. I was on a roll, with each operation taking less time to do than to describe. Proper roll pin punches are a must for the prospective AR builder. I highly recommend that anyone interested in a project like this get the AR video from Brownells and watch the section on the required tools a couple of times.

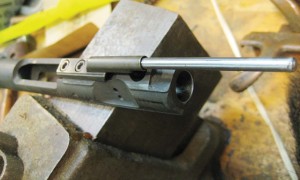
It pays to have an armorer for a friend. This bolt carrier has been modified to simplify the precise alignment of the gas tube notch in the barrel nut with the gas tube hole in the receiver.
With my confidence up, and following the Brownells’ AR video, I next tackled the small parts of the lower receiver. The bolt catch/release and its spring are held in place by a roll pin. A slip of the punch put a small ding in the black finish of the Bushmaster receiver. I was displeased by this, but since I planned to paint the finished carbine it was really no big deal. The trigger guard and magazine release came next and both proved to be easy to install. The most complicated part of the lower receiver is the trigger mechanism. I had acquired a Geissele SSA-E trigger for this project and since I had replaced factory triggers with Geissele units before, the installation went smoothly. Geissele provides great directions with their triggers and the slave pin included with each trigger makes alignment of the trigger and hammer (with the holes in the receiver) a snap. Lastly, I installed the safety selector with its detent and spring, held in place by a Magpul MOE+ handgrip in flat dark earth. I was going to install the buffer tube and stock next but was temporarily halted by the lack of a couple of small parts. The detent and spring for the rear take-down pin, which goes under the receiver end plate, were not in our small parts kit. I’d get these when I went to John’s shop to install the barrel and hand guard next week.
After shooting an IDPA and 3-Gun match on a Sunday at the Fort Harmar Rifle Club (and camping with my dog at the range), Monday found me in John Miller’s shop with my box of parts and a partially assembled AR.
The first order of business was to finish the buffer tube and stock installation. John had the needed detent and spring for the rear take-down pin and I had planned to wait to torque and stake the extension lock nut in John’s shop, as he had a foot-pounds torque wrench. I did not acquire the upper and lower receiver vice blocks from Brownells. I simply used an old magazine to hold the lower in the vice when working on it at home and at John’s shop we used the Geissele Reaction Rod (available from Brownells) to hold the upper receiver and barrel while working on them.

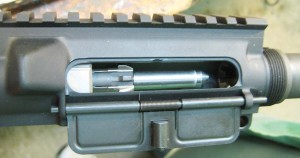
In this photo the Daniel Defense barrel has been locked in place with the barrel nut and the mid-length gas tube is in place.
Installing and head spacing the Daniel Defense lightweight 1 in 7 twist 14.5” barrel was simpler than I thought it would be (John had the required head space gauges). The barrel is held in place by the barrel nut. The nut I used came with the 12” free float handguard from Midwest Industries. This handguard incorporates the new M-Lok rail technology from MAGPUL. After tightening the barrel nut (and aligning the barrel nut cut out with the receiver hole for the mid-length gas tube), a light coat of the provided retaining compound was applied to its outside surface and the handguard slid into place. The two securing screws were torqued to 35 inch pounds, locking the hand guard in place. Shimming and tightening the BCM flash suppressor (which was pinned and welded) finished the barrel part of the project.
I had a pretty complete carbine at this point. Sliding the Mission First Tactical Battlelink Minimalist Stock on to the buffer tube essentially completed the lower receiver. This is high tech military grade polymer stock assembly that is incredibly rugged for its 5.8 ounce weight. All that the upper receiver needed to be fully functional was a bolt carrier assembly and charging handle. Having used the Relia-Bolt from the Sharps Rifle Company in another rifle with great success, we chose to use their complete Balanced Bolt Carrier in this home built carbine. This bolt carrier is machined from S7 steel. After heat treating, it is finished inside and out with NP3 to minimize the need for lubricants and make cleaning easy. This is one smooth running bolt carrier group and I highly recommend it as an addition to any AR platform rifle. To complete the upper, I used a BCM Gunfighter Ambi Charging Handle. The BCM charging handles have been designed to take the strain off of the latch roll pin for greater endurance and I chose the Ambi Handle in order to have additional clearance of any optics that may overhang the rear of the receiver just a bit.

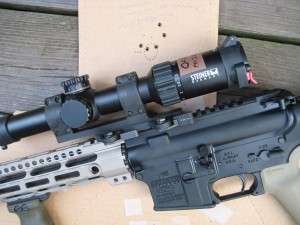
The author’s home-built AR carbine is a shooter as this group, fired at 100 yards, illustrates. Ammunition was Mk 262/77-gr. BTHP.
After completing the carbine’s assembly, John and I gave all the moving parts a good coating of Mobile 1 Synthetic and ran out to the Fort Harmar Rifle Club for a function check. 30 rounds of M-855 later, I was on my way back to the mountains with a complete and personalized AR Carbine. “Personalized” is the key word. With the endless supply of aftermarket parts and accessories, it is easy to configure an AR rifle or carbine to meet the needs or tastes of any shooter out there. And, it doesn’t take a lot of time, or money, or a visit to the local gunsmith (with the attendant wait). Total time to complete this “build” was right at three hours of actual work; and, it was fun and educational.
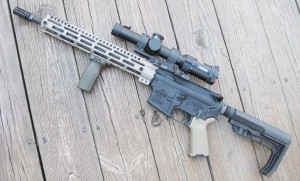
Final notes. Upon my return home, I mounted a Steiner Military 1-5x24mm scope, with the Rapid DOT reticle, on the carbine using a LaRue Tactical SPR-1.5 QD mount. This Steiner scope is a high end unit that has great optics, a simple to use reticle, and a mil based elevation dial making longer shots possible when necessary. Using the one M-Lok rail section included with the Midwest Industries handguard (they should include several), I attached a stubby MAGPUL RVG Vertical Grip to the bottom side of the handguard and fitted a VTAC sling to complete the outfit. I need to acquire another M-Lok Rail section to provide a mounting surface for a white light, but that’s about it: the three hour AR was completed.
I really didn’t need another AR to kick around the gun room, but have derived a certain amount of satisfaction shooting a carbine that was a product of my own imagination and effort. And, the gun does shoot. With the Daniel Defense barrel’s 1-in-7 twist, this newest addition to my AR battery has a decided preference for MK 262 ammo with its 77-gr. Sierra Match King bullet. Initial 100-yard five-shot groups with this load have averaged just a tad over 1¼ inches. Groups shot with M855 (the Administrations dreaded “green tip”) ran 1½ to 1¾ inches and some old 55-gr. Norinco ball produced groups measuring right at 2 inches. For my purposes, this is more than acceptable accuracy and more importantly, this home built AR has been 100% reliable with all the ammo tested using an assortment of magazines. Although the results aren’t in yet, the 3 hour AR acquitted itself quite well at its first match at the end of May; no failures to function and more than good enough accuracy.
That’s the complete run down on the three hour AR. For those with even a modicum of mechanical skills (like me) assembling an AR platform carbine or rifle from scratch should not, in my opinion, be viewed as a daunting project. To get started on your own build, I highly suggest you first get out your Brownells catalog and order the “How to Build an AR 15” video (part # 080-000-587). Then, acquire the basic tools for working on the AR platform. After you have decided what AR configuration you wish to build, make out your parts list (the video has a checklist) and start ordering. The good news is these purchases can be spread out over time so as to not break the bank. Also, bear in mind that the lower receiver of the AR needs to be shipped through your local FFL dealer; all the other parts can be shipped direct to you.
There is a danger in building your own AR rifle, and my three hour AR build has served as a catalyst for other potential projects. There may be a MK 12 upper in our future and then maybe a, oh well…..Good shooting.


