by John Markwell | Contributing Editor
We’d be willing to bet that most readers of TGM are closet gunsmiths. Most of us either like, or sometimes have, to tinker with our handguns.
Whether simply swapping out a set of grips (stocks, if you prefer), doing a complete strip and cleaning of a Colt, Smith & Wesson or other revolver, or getting that 1911 down to a bare frame and all the parts. Having the right tools at hand can make the job easy and eliminate those #@*^># moments.
Many jobs are more than doable by the hobby gunsmith with tools already owned. Some tasks are made easier by using specialty tools available from gunsmith supply houses like Brownells (brownells.com). What follows is a brief discussion of some of the handgun projects we have undertaken over the years and the tools, both every day and specialized, that we have found useful on our bench. Remember; before you attempt to clean, or work on, any firearm, make SURE it is unloaded.
Basic Tools The basis of any gunsmith’s tool box is screwdrivers, which, in these modern times, includes Phillips, Allen (hex), Torx, and a host of specialty gun specific drivers, as well as the traditional flat blades. Flat blade gunsmith screw drivers are hollow-ground for a precise fit and full contact in the screw slot. The hollow grind keeps the blade from popping out of the slot under pressure and augering the screw head, or worse. After many years of making do and trying to grind screwdrivers to fit specific screws, we finally took the plunge a while back and acquired one of the Magna-Tip Professional Super Sets from Brownells.

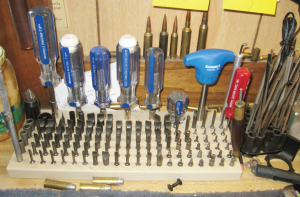
The Magna Tip Super set of screw drivers is a must for any serious hobbyist’s bench. Note the file holder at right made from old revolver cylinders.
This screwdriver set, with its bench storage block, comes with six different Magna-Tip compatible driver handles and an awesome assortment of 124 Magna-Tip bits. I can’t honestly say that I haven’t buggered up a screw head since acquiring this set-up, but those few I did were my fault, not the drivers. The Magna-Tip bits are made in America, have a lifetime warranty, and are worth every penny. Fixed blade drivers designed for gun screws are also plentiful and for some applications are more convenient than the Magna- Tips. We have fixed blade screwdrivers on our bench in sizes that we use most often, like for S&W revolver side plate screws and 1911 stock screws. No one minds good honest wear on a handgun’s finish; it’s just a sign of time spent afield. However, everyone hates those gouges, scratches, and bunged up screw heads that come from trying to make do with hardware store screwdrivers. If you acquire no other tools for your gun room or bench, get good screwdrivers.
Other handy tools for basic handgun work include an assortment of punches.
Having steel, nylon, and brass punches, as well as a set of roll pin punches, is useful. We have also found that a small hammer with a brass and nylon face, a bench block (easily made from a hockey puck), and a bench pad or a piece of carpet to pad the work surface are indispensable.
Complete disassembly There are times when getting down to the bare handgun frame is required and, as you might have guessed, this often requires more tools than just screwdrivers to be done right.
The GI 1911 pistol can be completely disassembled using only its parts as tools (really). However, it is easier if one has a few other tools to work with.
For starters, a bushing wrench may be useful if the barrel bushing is tightly fitted (we like ours finger tight). A couple of punches are also handy for working on 1911s although the firing pin can serve. We have a perfectly sized double ended punch that we made years ago for 1911 work. We use this punch for slide disassembly as well as for pushing out the sear, hammer, and mainspring housing pins on 1911 autos. It has a turned walnut handle and 45ACP cases for ferules on each end. For dealing with the plunger tube’s safety detent during re-assembly, we have a Marvel Detent Pusher. The Pusher has a cupped tip that will not slip off the detent pin while putting the thumb safety back in. The10-8 Performance Armorer Tool can also serve for pushing the safety detent, as well as offering a non-marring tool for pushing or prying while working on other firearms.

The author’s modified file for lowering front sights. The plastic creates a safe area that glides over the top of the rear sight keeping the cut on the front sight square with the top of the rear.
For working on S&W revolvers with their round head pins, a set of cup tipped punches is invaluable. Buggered up screws and beat up pins are the two most obvious signs that a revolver has been worked on by a true rookie. Also for S&W revolvers, a slotted Rebound Spring Slide Tool is very handy for the removal and replacement of this spring-loaded part (still, watch your eyes).
In perusing the Brownells or Midsouth Shooters (midsouthshooters.com) catalogs you will find many gun and task specific tools. There are specific tools, and even complete tool kits, for working on Glocks, Sigs, and Beretta pistols as well as specialized tools and screwdriver sets for single-action revolvers. Some of these seem to be more for convenience while others, like a Ruger MKI/MKII Takedown Tool, are pretty handy in light of the notorious hassle of dealing with the take-down and assembly of the iconic Ruger 22 pistol.
There are times when two hands just aren’t enough and some sort of assistance is needed to hold a handgun or some part. We have a large bench vise out in one of our sheds, but for use around the gun room we have two different sized machine vises (drill press vises) that get used quite a bit.
We have a set of Brownells Magnetic Rubber Faced Vise Jaws for the larger of the two vises to keep from marring handgun finishes. However, our most used vise is the VersaCradle Vise from Berry’s Manufacturing (berrysmfg.com).
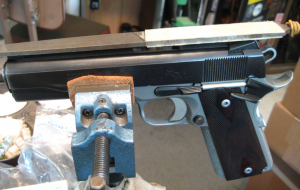
The VersaCradle vise is securely mounted on the bench via screws and has a pivoting, locking ball base with a 1.5 inch Palmgren vise attached. The locking ball base allows the vise, and whatever it is holding, to be turned and tilted to any angle or attitude and securely locked in place. This is one of those tools that we use so often it’s hard to remember what we did with it last. For handgun work, the small 1.5 inch Palmgren vise is just ideal in size.
It is big enough to securely hold complete handguns or larger parts like slides or barrels, and small enough to hold small delicate parts. We use a simple folded leather pad to keep the steel jaws from marring finishes.
Other tools we occasionally use for holding stuff while working on handguns or their parts include forceps, small Vise Grip pliers, a couple of pin vises and our fingers.
Removing material A whole article (or a book) could be written on tools for stoning, sanding, grinding, and filing on handguns. We have on hand in the gun room everything from a Gesswein Ruby stone and some other India stones for extremely fine honing and polishing of metal surfaces to standard Mill files for serious metal removal. There are a myriad of stones on the market as a perusal of the Brownells catalog will illustrate. Generally these are used for removing small amounts of metal (like knocking down small burrs) and for final polishing of small surfaces like sears and hammer notches. Files are used for more aggressive material removal. On our bench we have everything from plain old mill bastard files down to needle files of different shapes and some small Rifflers for working in tight places. The files we find most useful are some small Swisspattern Pillar files for fine filing and a Barrett file for working in tight places.

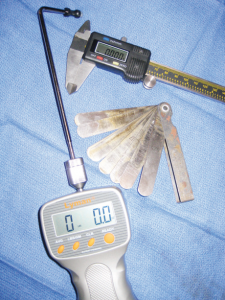
The Lyman trigger Pull Gauge is a must for doing handgun trigger jobs. Calipers and feeler gauges are just a couple of the measuring devices that are useful around the home shop.
A selection of emery cloth in assorted grits is also kept handy. Lastly, we also have an old die grinder (similar to a Dremel Tool) for high speed grinding and polishing; we use the felt bobs with polishing compound the most.
Regulating sights Adjusting handgun sights seems to be one of those tasks that keeps popping up, whether on our own guns or those of friends. Here are some tools and techniques we’ve used for doing just that.
Fixed sights can be the simplest to regulate or the most vexing and sometimes complex. The simplest fixed sight adjustment is not an adjustment at all but simply involves shooting different loads through the gun until you find one that prints to the sights. If regulating the sights to a specific load, the other simple fix is lowering the front sight to raise the point of impact if the gun is shooting low. This can be accomplished by replacing the sight, if possible, or filing it down. The latter assumes you have a pretty tall front sight to work with. For filing front sights, we have a special file on which we glued a thin sheet of plastic covering about half its length. The plastic glides over the rear sight (which is used as a reference point) when filing down the front. This keeps the cut on top of the front sight square with the top of the rear sight. For determining the height of dovetailed front sights, we have used the plastic Front Sight Test Posts which we got from Ashley Outdoors (now XS Sights, I believe) years ago. Slide one of these into the front dovetail and then shoot and trim the test post until the proper height is obtained for your zero. Then, measure the Test Post before cutting the metal sight blade to the proper height.
Horizontal deflection can be regulated by drifting the rear sight left or right, if it is mounted in a dovetail cut.
We’ve used everything from brass and nylon punches and a hammer to sophisticated mechanical sight pushers to make this adjustment. We have been using a sight pusher we bought off of the Internet for about $50 for a while now. Made from aluminum plate, this unit is capable of removing/moving dovetailed sights on most auto pistols.
If regulation is required of a fixed rear sight that is a simple notch, there are only a couple of options; widen/move one side of the notch with a Barrett file or slightly turn the barrel in the frame.
(There is also an option requiring a lead bar but we won’t go there.) Other handy tools Handgun work sometimes involves some pretty fine maneuvers and often some magnification is required to see what you are doing. The Opti-Visor is one of those deals that, once you have one, you wonder how you got along without it. This is a flip-up, dual-lens, hands-free magnifying system that can be worn with or without glasses and allows one to see work surfaces in great detail. The Opti-Visor lets one use both hands for whatever the task while magnifying the work area. Different magnifications are available by using the interchangeable lens system.
If you fool around with handguns long enough you will probably get into doing trigger work. If you do tackle trigger work, a trigger pull gauge is a mandatory tool for any bench. We prefer the Lyman trigger pull gauge with its digital read-out and average function. Also for measuring, a set of feeler gauges and a Caliper, either dial or digital, are almost indispensable.
Most of the basic tools for handgun work are small and can create quite a bit of clutter on the bench if not somewhat organized. To this end, we find a tool box of some sort with drawers and a few homemade storage blocks to be invaluable.
Needless to say there are a lot of different handguns out there and few folks have a complete knowledge of the workings of all of them. As with other endeavors, knowledge is important and books and videos can offer the hobby gunsmith access to the collective knowledge of many folks in the industry.
The handgun shop manuals by Jerry Kuhnhausen, the Gun Digest Assembly Guides, and the American Gunsmithing Institute Video Instructional Series are just a few of the reference materials available which can provide invaluable information, tips, and techniques to the hobbyist wanting to work on handguns.
Many home handgun projects don’t require a lot of tools and even the simplest, when successfully completed, can be immensely satisfying. If one starts with small jobs, your tool box will slowly expand along with your knowledge and interest in more complex projects. Accumulating new tools for specific jobs can be half the fun of home handgun ’smithing and perusing the Brownells (brownells.com) catalog is a pleasant (and sometimes expensive) way to pass time by the fire in the evening. Remember: be sure to unload, go slow, measure twice and cut once, and, good shooting.


